Search for the terms “Four Corners Classroom” online and you’ll find variation after variation of this cooperative learning strategy. The way we do “Four Corners” in my little corner of the world has evolved over the years. It’s one of those strategies I use so often that I dismiss it as “normal”… but maybe, this versatile strategy is just what you need to get your kiddos moving and talking about mathematics when we return to the classroom (and this turkey coma wears off).
I know my Math 7 crew will benefit from a little refresher regarding circles and circumference, so I’ve created a Four Corners for them to try when we return to class next Monday.
Creating a Yencafied Four Corners Resource
Create four similar-but-different problem sets that address the math concept at hand. Use an icon to differentiate between each of the four sets. This can be something novel (symbols that indicate different types of weather, animals, card suits, etc.) or the icons can address math concepts (use various, relevant math shapes or symbols, as in my example that follows here).
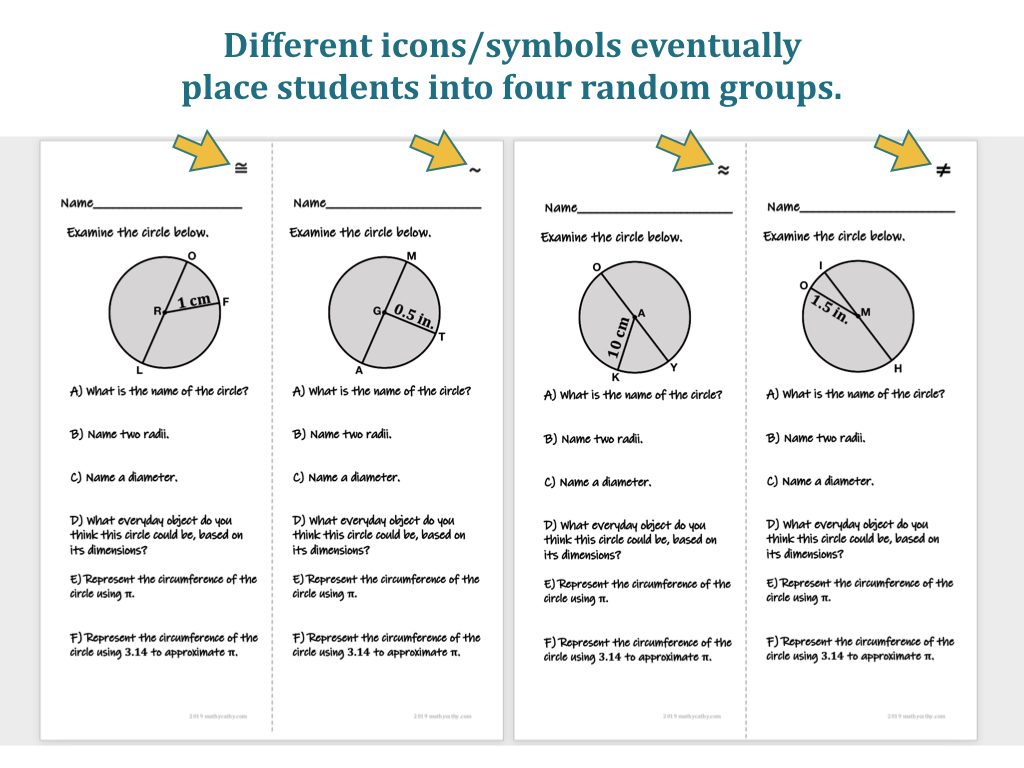
Copy the two Four Corners sheets, one sided, and cut vertically down the middle. Distribute one half-sheet per student such that no two students in a cooperative group receive the same problem set.
PRO-TIP: To help with this process, I suggest having TWO copies of each of the two pages. When placing in the photocopier top tray to run copies, stack the pages such that page 1 and page 2 are stacked on top of one another. THEN, stack the SECOND copy of page 1 and page 2, but rotate these two pages 180º, then place these two sheets under the first two sheets. Set the copier to collate, and voila! Cut the entire stack vertically down the middle, place one half-stack on top of the other, and you’ll have a beautifully mixed stack guaranteeing that groups of 4 or less will NOT have any duplicate sheets within the group! Every kiddo receives a different problem set!
Now that you’ve created, copied, collated, and cut the sheets, it’s time to use them with students!
First, students work on their own half-sheet silently and individually for a few minutes. When appropriate, consider allowing students to reference any resources they have handy. When students try to collaborate within their group, they’ll soon find that their own paper is different from every other group member’s! The first time one uses this strategy, students are very much caught by surprise that each paper is unique! Once this strategy becomes a regular occurrence, students know their papers differ from the start, and simply get right to work independently. {NOTE: Just as with Numberless Word Problems... students who attempt to collaborate are placed in a position to discuss big ideas and relationships, rather than specific ‘answers’… which I LOVE and did not anticipate when I first started doing this…} Meanwhile, I walk around and peek over shoulders, but I say nothing… I just observe what they’re trying, and how they’re progressing. MANY MANY times, students say to me as I pass by comments like, “Oh! I know what to do!” or… they look at me longingly and say, “I totally forget how to do this…”
≅ ~ ≈ ≠
After some time has passed, and some students have completed the task (it’s also okay if some haven’t fully finished) allow students whose papers contain the same icon/symbol to meet in each of the four corners of the classroom. I verbally and on-the-fly assign an icon to a classroom area/corner so students know where to meet and talk with the folks who had the same problem set from the get-go. Students take their papers and writing utensils to the new location to collaborate with their group.
NOTE: This is a neat-o opportunity to assess students’ knowledge of whatever math symbol/icon was used to create four unique groups. On my example here, I’m wondering whether students will know the difference between congruent, similar, approximately equal to, and not equal to… they will likely ask peers quickly to determine, “Which symbol do I have? Which one am I? Where should I meet with my group?” Sneak in a review or mini-teach on notation/symbols/shapes/any math visual you use to create the four groups… or just have fun and use icons of four different animals instead, ha!
Once all students find their corner of the room, they discuss, compare, and correct their own papers as needed. I never ask students to remain standing, but they just DO! They need to be able to walk around and chat with one another, comparing their papers. Everyone is standing and moving around! This is a great time for me to listen in, and notice if any groups are arguing and justifying their positions on any particular problems. The idea is that ALL students in that group come to an agreement, papers are modified as needed, and that ANY student’s paper within the group could be chosen by me as a “sample answer key” for their problem set. I often ask each group to decide upon a paper from their group that they consider to be an “answer key” and bring it to me. After I have an “answer key” from each of the four groups, everyone returns to their own seats.
Once everyone is seated, I present each of the four “answer keys” using the document camera. Another variation is to have each group send a representative to the document camera to present their group’s agreed-upon “answer key” paper to the class. I have also been the one to randomly choose a paper from each of the four groups… in theory, if everyone has discussed the problems, and made any necessary corrections, it shouldn’t matter whose paper I use. However, I am careful NOT to reveal the name of the person whose paper is being showcased at the front of the room, unless our class culture has reached the point where anonymity is not a concern. Ideally, though, I’m NOT the one presenting the problem set, but rather, a student (or several) from the GROUP is explaining the problems to the class. During the presentation phase, students at their seats are encouraged to respectfully ask questions of those presenting, and additional conversations and corrections often occur as a result.
Ideally, we usually spend 10 minutes or so on this whole process. It’s a great little exercise in retrieval practice, collaboration, movement, and presenting to the class!
This Four Corners strategy can literally be used for anything!
A pre-assessment… a warm-up… a review… a lesson closure activity… a great way to start a Monday morning to see if Friday’s math is still in their brains…
literally ANY TIME.
I love that this sort of activity promotes both MOVEMENT and STUDENT DISCOURSE. It’s a variation on “YOU DO… Y’ALL DO… I-DO-or-intervene-as-needed”. Sometimes I make up my own problems from scratch… other times, I use ancillaries that have versions A, B, etc. of homework or practice problems as my inspiration for the four problem sets.
How does “Four Corners” look in your classroom?
Grab the PDF for my circles Four Corners as an example, and share back when you create something awesome!
ANOTHER NOTE: The circle diagrams on my Four Corners example here were created using Apple’s Keynote first. I used shapes and text boxes to create the first circle on a slide, then duplicated and edited it three additional times to create four slides. I tried sneaking in letters on each circle that represent texting lingo or silly words, and I researched common circular objects when I chose each radius measurement. I’ll be curious about the everyday objects students think about! Finally, I exported the four Keynote slides as images, and dragged each image into the two-column Word document, where I added the questions. #KeynoteForMath











Thank you for posting this. I learned this strategy at an AVID reading conference and am sooooo happy to see it spelled out for us Mathy folks.
Do you ever have the students do the other problems?
Thanks for stopping by, Amy! Yes! Sometimes I *do* have students try the other problems! Sometimes, I’ll include 2 or 3 problems on the half-sheet for each of the four groups… maybe the first problem on each sheet differs… but the next problem is shared between the groups… I like to mix it up!
Cathy-
Love this!! Especially the copier tip. Shared it with my SIL who teaches 8th grade science. Get kids moving, talking about the content, accountability, awesome. Thx for sharing as always!
Steph! Hello pal! Great tip that something like this could be used across content areas! I hope all is well with you! I just used your inequalities Desmos activity in class! 🙂
Ahem, minor correction, “our” inequality desmos activity 🙂
Aww shucks, you are kind to say that! 🙂