 I kid you not – when I say, “Get out your iPads and go to Nearpod” my 8th graders literally say, “YESSSSS!” and give a little fist-pump… every time. It’s not necessarily Nearpod that they love, but the peer interactions and instant feedback it facilitates. In a nutshell, making your Nearpods about “them” and not about “you” is the way to go. Think about what the students will be doing versus what you, as the teacher, will be doing. Students should be engaged and have ample opportunity to show what they know during any NPP (Nearpod presentation).
Perhaps having a few days away from the classroom is getting those creative juices going in the minds of math teachers. This week I’ve been contacted several times by different math folks all aspiring to use Nearpod in their mathematics classrooms. Even more specifically, mathy people are wanting to use Nearpod more effectively, and have asked me for ideas regarding “Nearpod Best Practices” in the mathematics classroom.
Here are some excerpts from e-mails I’ve been sending to individuals – I hope these first-hand experiences and tips will help as you Nearpod in the New Year!
Yes, I just used Nearpod as a verb.
Nearpod ≠ PowerPoint
It’s tempting to just refresh those digital presentations you might already have by dumping them into Nearpod. This idea in and of itself isn’t a bad one, but if there are more static slides than opportunities for student input, your Nearpod may fall flat. I’ve had success in limiting the number of “static” slides in a NPP and adding lots of assessment tools that constantly gauge student thinking.
In my humble opinion, Nearpod is best used as a segment of a lesson, not the ENTIRE lesson. Consider a Nearpod at the start of class to pre-assess or review homework. Consider a Nearpod to introduce a topic. Or, use Nearpod to review and assess after a lesson has taken place. Just as a PowerPoint or Keynote shouldn’t last 50 minutes, a NPP shouldn’t either.
Nearpod “Draw” = Instant Error Analysis
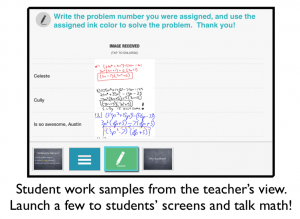 It’s really not about the NPP – it’s about the peer relations Nearpod facilitates with ease. “Draw” doesn’t have to mean “draw a picture” – mathematical work can be “drawn” too! Present some content, then ask the students to solve a problem and “draw” what they know. (AKA “show your work!”) This allows you to virtually send every student to the board! Think of the paper “exit ticket” of the past, but administered when needed during a lesson (rather than only at the end) with instant digital work samples from every student (rather than annoying little piles of paper to sort in hopes of helping your students tomorrow.) Nearpod redefines the “exit ticket” concept completely.
Don’t be selfish and keep all of those awesome work samples to yourself. Launch correct and incorrect work to ALL students’ screens, or at the front of the class, so discussion can immediately ensue. Consider framing each anonymous, launched work sample by saying, “Tell me something you like about this student’s work, and then tell me something you don’t like about it.” Or, “Tell me something you notice about this problem, and then tell me something you’re still wondering about.” Students are happy to comment on their peers’ work, especially in an error-analysis mode. Being able to scan instant student work samples is powerful data for the teacher, but gains the MOST power when shared with students to encourage rich mathematical discussions. Trust me, they are very happy to comment on their peers’ work.
Nearpod “Polls” and “Quizzes” = Positive Peer Pressure
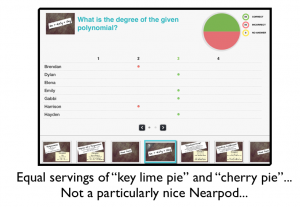 Students also love polls and quizzes, but please don’t keep that pretty pie chart to yourself! When launching a poll or quiz, I put my iPad under the document camera and zoom in so only the moving pie chart is visible on the screen at the front of the class. They LOVE this – we even have weird sayings about these graphs during “quizzes”. Since green sectors indicate correct submissions, and red sectors show incorrect submissions, my students yell for “key lime pie” (green) and get all worked up when a graph starts turning red (“No! No more cherry pie! C’mon guys!!!”) This is a silly thing that has developed in my own classroom, and they really do like it… and own it. Peer pressure plays a positive role in Nearpod “quizzes” and “polls”.
Do you feel like your Nearpods are boring? Here are some questions to consider:
- Do you have enough interactive features in your NPPs versus static slides of information?
- Do you try using Nearpod for shorter spurts of the lesson rather than for an entire class period?
- Do you encourage student dialogue as a key part of Nearpod experiences?
- Do you display class data for everyone to see, versus keeping it only on your own screen?
I’d love to hear how you’re using Nearpod with success in the mathematics classroom! Feel free to comment below.
To hear me share more “Nearpod love” check out this interview.
To see Nearpod content I designed, click here.
Thanks for the mention on the Nearpod blog!







Hi. I’ve been thinking about starting to experiment with Nearpod in my teaching now as well (you are very convincing). For interactive activities I have been using Socrative. For me, the advantage I can see with Nearpod is a draw activity to show work, and the ability to choose one of them to send to all the students as an example.
But here is a question for you. When I use Socrative the questions I ask tend to be short/simple enough that I can get 90% response within a narrow time frame – but the activities that I would choose for Nearpod where they need to show their work would naturally be more complex
In itself this is a good thing, but from my experience this will greatly increase the time
differential for when some students finish – in other words, some groups will finish long
before others and I don’t want them sitting there bored. How have you handled this?
When I normally have more complex activities I have several follow-up problems
and such, but with nearpod they will have the one draw screen and then can’t do much
with it after submitting until go on to the next slide for everyones as far as I can tell.
Have you found some convenient way of handling this situation?
Hi David,
You have a valid concern! Sometimes, I walk around my classroom and talk about the work samples I’ve already received to provide some generic verbal feedback to those who are done as I wait for the other students to finish. For those that begin to linger too long, I give verbal cues such as, “You have 30 seconds left to submit your work. Even if you’re not done, send it along and we’ll consider what you have so far.” Also, balancing a “draw” slide with a “poll” that can be quickly completed helps to “up the energy” the way you describe your use of Socrative. Students especially like this if they can see the data from the whole class as described above.
During “draw” downtime, I haven’t experienced boredom per se – students know I’m about to send work to all screens, and that their OWN work is in the mix. That in-between time is generally laced with anticipation and a welcome-but-brief brain-break instead. However, I would never let that timeframe last too long, and my students are insanely well-behaved, so my strategies might not work in every classroom.
I am just getting started with Nearpod since my high school math classes are getting class sets of Chrome books later this month, which is both exciting and stressful. I love the idea of using this technology to keep engagement high during key times in my 90 minute blocks.
Do you have any suggestions for making the most of my instructional planning time when it comes to implementing and preparing Nearpod lessons?
Thank you!
Hi Stephanie!
In terms of planning time, perhaps looking through concepts in your current unit and deciding ahead of time which topics are conducive to Nearpod would be a good start. Do you aspire to make very content-specific Nearpods? If you are looking to maximize your ability to gain instant student feedback, while minimizing the time you spend planning and creating content, a “Nearpod Template” model may work well for you. Check out this post to see what I mean: http://www.mathycathy.com/blog/2013/02/how-to-use-socrative-or-nearpod-on-the-fly/
I think that will be the perfect way to get started. I teach 5 different math classes throughout the day, so it all gets a little hectic. The “template” along with the idea being able to toss in the quick review problem set here and there should get things going fairly well this semester 🙂
I looked at some of your other posts and noticed you were using the same Algebra 1 book as we use as well. I might just be able to use some of your lessons in the Nearpod “store” after all (the 7th grade stamp threw me off a bit).
Thanks for the suggestions! It is greatly appreciated.
Great! I’d love to hear how it goes! FYI – the vast majority of the lessons in the Nearpod “Store” are aligned to Grade 7 Common Core, not Algebra 1.
🙁 Well, at least I hadn’t purchased them yet. I don’t suppose you’re supposed to edit them if you’re using the pre-made ones.
I’ll let you know how things are going if this whole implementation thing doesn’t do me in. With any luck, my administrators will see the value in Nearpod as an instructional tool so I won’t have to pay for the upgrade myself when I run out of space!
I am LOVING Nearpod!!! I teach 10th grade Geometry. I have used it for an entire class recently in Homework mode since I had 5 people sign up and received the Gold membership free for 6 months. It has been amazing to watch students “plug in”, watch a short video lesson made in Doceri, practice, check for understanding along the way and GET IT! There are some students that took more notes than they have all year. The advantage of Homework mode is students working at their own pace and I can help those who need it. I am finding it a great idea for days with substitute.
Thanks for sharing, Ana! It’s great to hear about others who are experiencing such success with Nearpod firsthand. The Homework option is also one of Nearpod’s versatile features! Thanks for the reminder that Nearpod can be student-paced in a homework-mode… and great idea for use with subs!
Pingback: Representing Addition and Subtraction with Nearpod | The Apptive Learning Lab
Pingback: Get the Most Out of Your 1:1 Classroom with Nearpod
Your near pods have fun slides backgrounds & designs while mine is basic blue with few options. Do you get the better graphics with an upgrade or is that something only authors have access to? Or user error ? 🙂
So excited to try near pod for the 1st time next week! You’ve inspired me!!
Hi Nikki! No upgrade needed – I design slides using Keynote on my Mac, then I export the slides as images (JPG) and upload them to Nearpod. Others also use the free graphic site “Canva” to create Nearpod slides. I’m so excited that you’ll be trying Nearpod next week! Please share about how it goes! 🙂
Pingback: 10 tips for using Nearpod in your Math class
not only am I loving nearpod, I have used some of your lessons to help teach concepts to my 7th graders. Thank you for creating such clear, and precise lessons for the students. I am on my way to creating my own, but until then, I am thankful for the library of resources available to us!
Fantastic feedback! Thank you – and I know you’ll find great satisfaction when you begin creating your own lessons for your students as well. Please let me know if I can help!
Pingback: N is for Nearpod - Innovation: Education
Pingback: Using Nearpod for math instruction » Grey Ed Solutions
Pingback: Nearpod “Best Practices” For Math Class v2.0 | MathyCathy's Blog – Mrs. Cathy Yenca
Pingback: A Classroom Visit from KLRU – Screens In School: Tech Transformation | MathyCathy's Blog – Mrs. Cathy Yenca
I want to be able to handwrite my notes in NearPod, via ppt, so I can work out the problems for the students on my ipad during a live presentations format but I can’t figure out how to annotate on a Nearpod lesson from my end. I know the students can “draw” but I want to be able to draw as I go through the presentation. Is this possible?
Greetings! It’s sort-of-possible. On a Draw slide during a live presentation, you’ll see an “S” in the upper right corner of your screen, within the blue Nearpod banner. Click the “S” to activate Student View. Now you have access to the same Draw experience that students have. The “S” has now turned into a “T” so you may toggle back to Teacher View when you’d like.